Showing posts with label Crafty Fantasticky. Show all posts

Thursday, March 6, 2014

February Photography

I started a personal photo challenge at the beginning of the year. It's the "10 Can't-Miss Photos to Take Each Month" project. I found it via Pinterest and printed it out here. I had greater success this month than I had last month. Though, I will admit that there were still some pictures that I didn't take. Apparently, "Can't-Miss" is entirely relative.


Kids in Pajamas:


While I do have some gadgets, I'm a good old-fashioned computer girl. Oh, the places I can go... on my computer! From Diablo 3, Zoo Tycoon, The Sims, Facebook, Blogger and all the way into the stories that come straight out of my brain and onto my word document. I LOVE my computer! :)


My Loved Ones
If you want to see more pictures from our recent trip to this stunning location, see here and here.


A Romantic Night Out
Ben took me to Sundance to eat at the Foundry Grill. We got there early, so got the fireplace table!


 Valentines I got this year. It's awesome to have kids (and a husband) who make Valentines on their own.

I didn't have a Superbowl party... No Mardi Gras... I forgot to take pictures of the kids making valentines...

BUT! Audrey came home with valentine candy, so I was saved there. :D 
  

 As for High School sporting events... as I don't have appropriately aged children, we don't attend those types of things but maybe once a year.


I'm looking forward to March's pictures. There are quite a few options, though I'll honestly say.. March Madness isn't happening. No. Thank. You.

Tuesday, February 11, 2014

Sewing Again.. with a REpurpose!

I get the bug every now and again to craft something. That didn't happen this time.

The bug was to organize my linen cabinet. I pulled out my space bags of blankets and looked at all the baby blankets bemusedly. I certainly won't need these anymore, I thought with a mixture of relief and melancholy.

I sorted through the blankets and eventually found some blankets that I knew I couldn't give up. I will craft something out of these someday, I thought! But... I will need to do it soon because I have no more room in my craft bins for more STUFF.

I also looked at the sweet little crib sheets we bought for our kids and thought, Surely this cheerful fabric can be transformed into something?! (I love repurposing! It makes me feel really, really smart. We all like feeling smart, right?)

After a long hunt, I finally came across a pattern for a pillowcase dress and confirmed with my sister that she had used the same pattern with lovely results.

TheMotherHuddle has a really fun and easy to follow tutorial for the dress.  She even has suggested adjustments for larger sizes as I needed for my daughter.

The only change I made to her design was just using one type of fabric, since the crib sheet I was using didn't match any other fabric I had. So, I didn't make multiple panels, just the back and front. As a result, the time and effort were far less.

I didn't take any pictures of the steps I took in making the dress, since I wasn't sure if it would be a total disaster.

All I did was cut off the edge and elastic around the sheet and took a seam ripper to the corners. I ended up with a fairly large piece of fabric that was more than enough for what I was making. I had to iron the heck out of it, too.

Once I was done following the instructions, however, I came out with a dress that keeps getting cuter the more I look at it! I'd say that was a job well done!

The dress will eventually grow with her and make a cute top!


I'm so excited about how it turned out, that I have plans for at least two more!

Lesson learned: 

NEVER throw away old sheets (the cute ones, anyway)!

Sunday, February 2, 2014

Photography Fun!

I recently started a photo group on Facebook. All the members of the group take one themed picture a week and post it up on the page. It's been so much fun!

I also started a personal photo challenge. It's the "10 Can't-Miss Photos to Take Each Month" project. I found it via Pinterest and printed it out here. This one has been a little more difficult to complete. This has been, in part, due to the lack of cooperative weather/circumstance and, in part, because I keep forgetting about it..

However, I did manage to snap a few, and I plan on doing better in the coming months. I also plan on documenting what I manage to do each month here on the blog! :) It'll keep me honest, anyway.

Taking down holiday decorations

First family dinner

First Snow ( I also used this one in my weekly photo group!)

Bowls of soup...

There were quite a few that I missed this month. The big ones were snow-play related. While we did get snow, we just never made it out before it turned mushy or icy. Then we had nearly everything melt away. I know, excuses, excuses...
I don't have stacks of sweaters to take pictures of (I kind of hate sweaters). We don't have a fireplace to snuggle in front of.
There were also problems with pure laziness... I didn't take a picture of my first book of the New Year. However, you can look at it if you like. It's the Morrissey Autobiography.
I didn't take pictures of my kids buddled up to go out, in spite of the fact that we did that nearly every day.

No excuses. I'll do better next month... honest!

To make you feel better about my poor attempts at photography, I'll leave you with a bonus shot of someone cleaning up their holiday decorations:


Disturbing... yet satisfying.

Monday, December 9, 2013

Christmas Tree - Condensed

Since we extricated ourselves from my parent's basement, we've been trying to fit into a new space. One of the first things we knew would have to go is our old Christmas tree. It was over 7 feet tall and wouldn't fit in our new living room with its much shorter ceiling. So we got a new and, as it turns out, much tinier tree. There's a serious difference between a 7+ foot tree and a 4 foot tree.

We had to get a new angel anyway and it gave me the chance to try the "full" ornament style rather than the typical spacey style I've used in years past. Speaking of years past, my previous trees can be seen as follows: 2012, 2011, 2010. Before those years, I had a non-themed decorated tree, which I didn't typically take pictures of. A glimpse of my 2008 tree.

So, here is our condensed tree. This will be our tree for at least the next couple of Christmases. We'll get another big one once we have a taller ceiling. :) Then, this one will become the "kid" tree, filled with child-crafted decorations that can be handled without fear of resulting broken glass.

My normal-sized ornaments seem huge on this tree!

My theme this year is keys.


I got all the keys in a vintage-style key lot on Ebay. There were 150 of them all together, though I only used about 50 for the tree.


This angel ornament is, by far, one of the oldest on the tree. I got it about 20 years ago.

This mouse is Ben's oldest. It must be more than 20 years old, now.


Some year in the future, the keys will be painted white and rehung for another themed tree. After that, they'll go on presents for decorations. I'm also thinking some jewelry might be in order.

We're gearing up for a Christmas that reflects our tree: simple, full and meaningful.

I love the holidays!

Sunday, December 8, 2013

Passing on Traditions

I had a vague memory recently that lead to warm remembrances and a desire to share that experience with my children. I never knew what they were called when I was a kid, but I found them on Pinterest or some such just a couple of months ago.

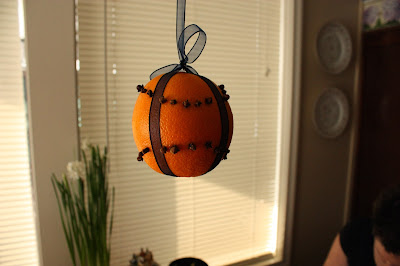
Pomanders.

Pomanders can be made in a lot of ways, but at Christmas-time, they're made of oranges and cloves.

Ben and I made things easy for the kids, pre-stringing the ribbon and poking holes for the cloves.

Henry's face... hahah!

Ben's baseball pomander. 
Just behind, you can see my overly-enthusiastic Paperwhites that decided they didn't want to wait for Christmas to bloom!

Audrey was completely focused and finished her pomander all on her own.

Audrey's whispered "ouch... ouch.. ow.. ouch" at every thorny clove brought out my sympathy as well as amusement.

Henry ended up needing help from me, but he was a trooper, anyway.


Patches wanted to know what we were engaged in that could possibly take the attention off of her!


We've strung them up throughout the house. Let's see how long it takes for the aroma to infuse our little abode!

Tuesday, July 23, 2013

Paper Nostalgia

When I was fairly young, perhaps around 10 years old, one of my sisters introduced me to paper dolls. The ones that came with outfits that could be traded out to my heart's content. Of course, I also learned that I had to cut them out myself. Not an easy task for someone of my age. Since this was my first experience, I was concentrating so hard on getting the clothes cut out perfectly, that I cut off the the most important feature of the delicate paper creations: the paper tabs. I discovered, to my dismay, that the clothes would not stay on no matter what I tried as long as they lacked the little tabs. I don't recall what happened with those dolls; perhaps the tabs were cut out and then taped on, or maybe I tried to play with them flat on the ground. Either way, the lesson was very much learned.

I've been thinking about paper dolls lately. I've wanted to give my daughter this experience as well. Well, not the exact experience. She wouldn't have been able to cut out those dolls to save her life. But, I wanted her to experience the joy of something so simple, and even a bit vintage, as a paper doll.

I did some looking around and, while there are a lot of paper dolls out there, not many of them appealed to me. I finally happened across some on Pinterest, and the link led back to here and here. These dolls are delightfully vintage, and wonderfully printer-friendly. Some brilliant person was able to take Hallmark's vintage wrapping paper and convert it into a digital format. Well, I knew a good thing when I saw it and immediately printed them out on card stock.

I think it took me nearly two hours to cut all of the dolls out, but they turned out super cute and my kids love them. That's right. Kids. Plural. Wee Willie was perfect for Henry, with fireman, cowboy, clown, baseball and football players and several other outfits. Dancing Debbie was a no-brainer for Audrey, with such outfits as cowgirl, jester, gypsy and countless fancy dresses.

At first, I cut out just a few outfits and gave them to the kids with the promise of more. I alternated new outfits between the two of them, and it didn't take long for them to wait anxiously at the door for the next new outfit. I also gave them envelopes to keep their little dolls safe.


The kids have been playing with them for several hours. I figure that in and of itself is worth the time, effort and printer ink.

And, perhaps, one day, they will feel nostalgic about paper dolls, themselves, and introduce their own children to them...

LinkWithin

Related Posts Plugin for WordPress, Blogger...